I've rebuilt my site using Astro
And it was a blazing fast experience
Motivation
The previous version of this website was also built with Tailwind CSS, but for static site generation, I was using Laravel (PHP yes) Jigsaw. The build was running on Netlify and the artifacts were also published on Netlify. All was good until the build was broken and I decided to rebuild my site.
The first attempt was with Next.js. I started also off by rebuilding all the components with Chakra UI (totally different than Tailwind CSS) and Storybook. That turned out great and is a great way to build a static site or a single-page application. However, the experience of turning plain Markdown into HTML was dreadful. I was plagued with several packages like frontmatter, greymatter and so on but it was confusing to get things going. After a day of yak-shaving, I quit and didn’t touch my site until recently when I decided to give Astro a swing.
What is Astro?
Astro.js is a modern static site generator that allows developers to build websites using web standards, such as HTML, CSS, and JavaScript, but with a focus on performance, simplicity, and ease of use.

Astro.js has several features that make it a popular choice for building static websites, including its ability to support multiple front-end frameworks such as React, Vue, and Svelte, as well as its support for server-side rendering and partial hydration. It also includes a built-in component system, which makes it easy to reuse and share components across different pages and projects.
Astro was designed for your content. Fetch data from any CMS or work locally with type-safe Markdown and MDX APIs.
What does it look like?
You define just like in React components in an HTML-like syntax. These component files have the .astro extension. Also like in React, you can use TypeScript to strongly-typed for example the Props which are passed in your component.
Here is a little example of a Tailwind-based component that shows a value item:
---
type Props = {
  text: string;
  result: number;
};

const { text, result } = Astro.props;
---

<div class="px-4 py-5 bg-white shadow rounded-lg overflow-hidden sm:p-6">
  <dt class="text-sm font-medium text-gray-500 truncate">
    {text}
  </dt>
  <dd class="mt-1 text-3xl font-semibold text-gray-900">
    {result}
  </dd>
</div>
How do you add Markdown content?
That is very simple. Astro follows a convention-based structure where all the content will reside in the directory src/content. For each category of content you create a sub-directory like for example project
Creating a schema for blog
To create a schema for your content you need to define the file src/content/config.ts which uses Zod schema to define how a project post looks like
const value = z.object({
  text: z.string(),
  result: z.number(),
});

const project = defineCollection({
  // Type-check frontmatter using a schema
  schema: z.object({
    title: z.string(),
    description: z.string(),
    banner: z.string(),
    value: value.array().optional(),
    pubDate: z
      .string()
      .or(z.date())
      .transform((val) => new Date(val)),
  }),
});
The nice thing is that you can also make compositions. Note the value field which is a composition out of an array but also of formerly defined z.object.
Rendering the data
After the data has been set up, you can need to render the data. To do that you follow another convention of src/pages/{type}/index.astro for the index page and src/pages/{type}/[...slug].astro for individual pages.
An example index page
In this example, we sort the projects in descending order of publication date.
---
import { getCollection } from "astro:content";
import Layout from "../../components/Layout.astro";

const posts = (await getCollection("project"))
  .sort((a, b) => a.data.pubDate.valueOf() - b.data.pubDate.valueOf())
  .reverse();
---

<ul>
  {posts.map((p) => <li>{post.data.title}</li>)}
</ul>
An example slug page
In this example, we look up the project by slug and if it’s not found we return a /404 page. Not that type Props = Collection<"project"> also works (magically) somehow
---
import { CollectionEntry, getCollection } from "astro:content";
import Project from "../../layouts/Project.astro";

const projects = await getCollection("project");
type Props = CollectionEntry<"project">;

const { slug } = Astro.params;
const post = projects.find((page) => page.slug === slug);
if (!post) return Astro.redirect("/404");
const { Content } = await post.render();
---

<Project {...post.data}>
  <Content />
</Project>
How to publish this?
As I’ve told you before I’m using Netlify to build and deploy my site. To support this in Astro it was very simple by adding a new package.
npx astro add netlifyAnd after that it’s just a few minor details which can be found here. But it took me five minutes to deploy my site. There is also support for tons of other integrations, which can be found here.
What about performance?
Recently Google added a new Chrome-extension web-vitals which measures:
- Largest Contentful Paint (LCP): measures loading performance. To provide a good user experience, LCP should occur within 2.5 seconds of when the page first starts loading.
- First Input Delay (FID): measures interactivity. To provide a good user experience, pages should have a FID of 100 milliseconds or less.
- Cumulative Layout Shift (CLS): measures visual stability. To provide a good user experience, pages should maintain a CLS of 0.1. or less.
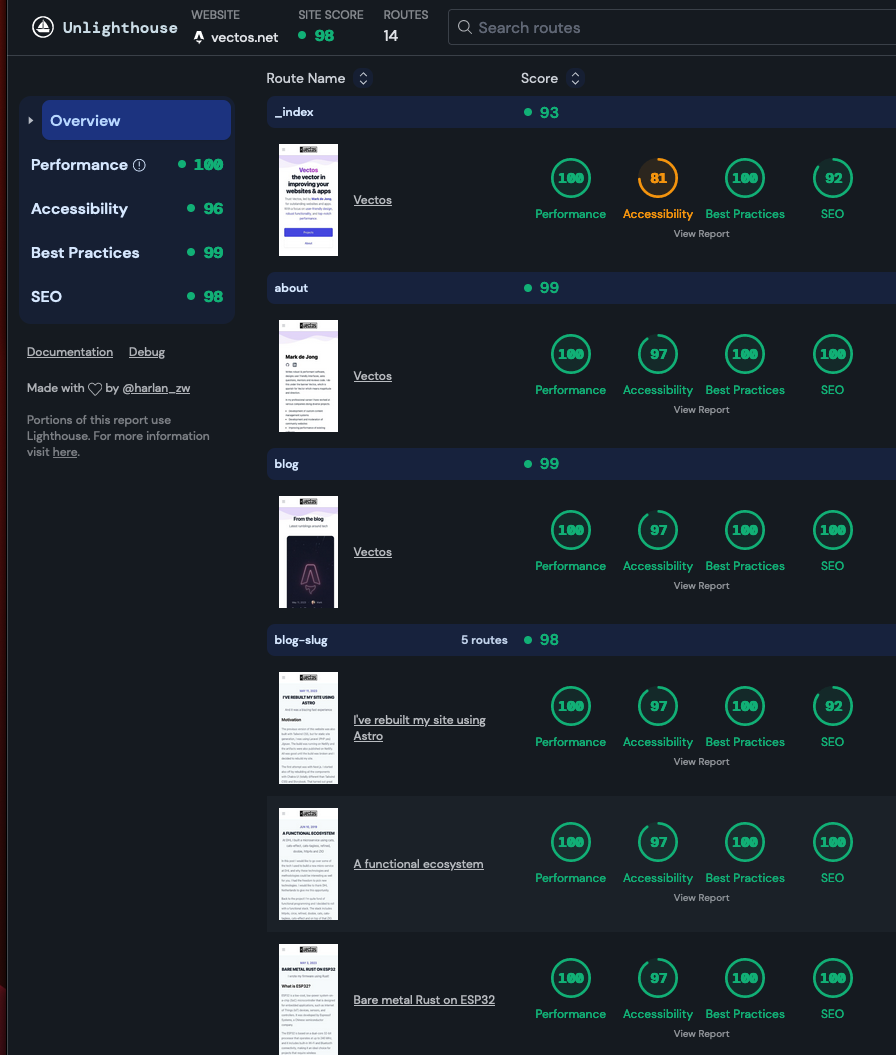
To easily test this you can use the Unlighthouse project.
I took this for a swing and the results were staggering.
Conclusion
It took me about 1 day to convert my site from Jigsaw to Astro.
A very good developer experience with almost zero errors. When the errors popped up, the messages were clear and it was easy to figure out where to look to correct the error. Also it support strong typing via TypeScript and the performance is really good!
I can highly recommend this framework for creating static sites like a personal website with a blog and/or project pages.